
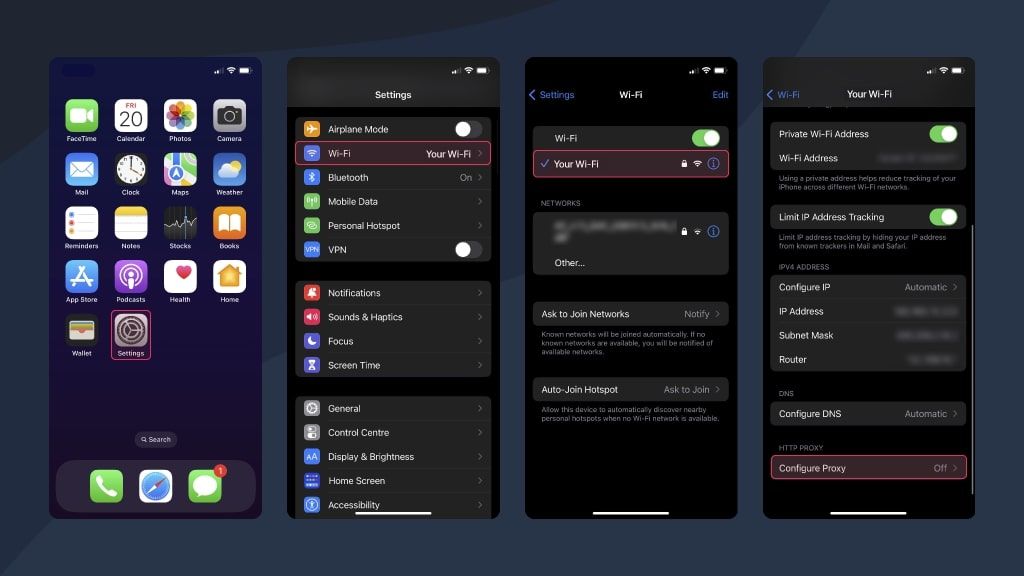
To configure a proxy on iPhone, go to Settings, tap Wi-Fi, tap the info icon next to your connected network, scroll down to Configure Proxy, select Manual, then enter your proxy server address and port number. The entire process takes under two minutes. This guide covers both manual and automatic proxy setup on iOS 18 and earlier versions, plus troubleshooting for common connection issues.

How Do You Set Up a Manual Proxy on iPhone?
Manual proxy configuration is the most common approach. You enter the proxy server address and port directly into your iPhone's Wi-Fi settings. According to How-To Geek's proxy guide, this method works on all iOS versions and gives you full control over the connection.
Here's the step-by-step process:
- Open Settings on your iPhone
- Tap Wi-Fi
- Tap the info icon (the blue "i" in a circle) next to your connected network
- Scroll down to the HTTP Proxy section
- Tap Configure Proxy
- Select Manual
- Enter the Server address (IP or hostname) provided by your proxy provider
- Enter the Port number
- If your proxy requires authentication, toggle Authentication on and enter your username and password
- Tap Save in the top right corner
To verify your proxy is working, visit a site like whatismyip.com in Safari. The IP address displayed should match your proxy server's IP, not your real one.
To disable the proxy later, go back to Configure Proxy and select Off.

What's the Difference Between Manual and Automatic Proxy Setup?
iOS offers two proxy configuration methods. According to Proxyway's iPhone guide, most individual users should use manual setup, while automatic configuration is designed for enterprise environments.
| Feature | Manual Setup | Automatic (PAC URL) |
|---|---|---|
| Best for | Individual users, single proxy | Enterprise, corporate networks |
| How it works | You enter server IP and port directly | iPhone downloads a PAC file that defines proxy rules |
| Setup difficulty | Easy (2 minutes) | Requires PAC URL from IT admin |
| Flexibility | One proxy for all traffic | Can route different sites through different proxies |
| Authentication | Optional username/password | Defined in PAC file |
| When to change | Must update manually for each network | PAC file updates apply automatically |
For automatic setup, select Auto instead of Manual in the Configure Proxy screen, then enter the PAC URL provided by your network administrator. According to Decodo's setup guide, automatic configuration is standard in corporate environments where IT teams manage proxy routing centrally.
What Types of Proxies Work on iPhone?
iOS has built-in support for HTTP and HTTPS proxies only. You can't configure SOCKS5 proxies through the native settings. Here's how each type compares for iPhone use.
| Proxy Type | iOS Support | Best Use Case | Speed | Security |
|---|---|---|---|---|
| HTTP Proxy | Native support | Basic web browsing, content access | Fast | Low (unencrypted) |
| HTTPS Proxy | Native support | Secure browsing, banking, email | Fast | High (encrypted) |
| SOCKS5 Proxy | No native support (requires app) | All traffic types including apps | Medium | Medium |
| Residential Proxy | Via HTTP/HTTPS | Bypassing geo-restrictions, scraping | Fast | High |
| Mobile Proxy | Via HTTP/HTTPS | Social media automation | Medium | Highest |
An important limitation: iPhone proxy settings only apply to Wi-Fi connections. Cellular data traffic doesn't route through the configured proxy. According to Oxylabs' iPhone integration guide, if you need proxy support on cellular connections, you'll need a VPN app or a mobile device management (MDM) profile.
For choosing the right proxy provider, see our best TikTok proxies guide which covers residential and mobile proxy providers. For broader API-based options, check our best web scraping API comparison.
What Are Common Problems and How Do You Fix Them?
Proxy setup on iPhone is straightforward, but a few issues come up regularly. Here's how to diagnose and fix them.
| Problem | Likely Cause | Fix |
|---|---|---|
| No internet after enabling proxy | Wrong server address or port | Double-check both values match what your provider gave you |
| "Authentication Required" error | Username or password incorrect | Toggle Authentication on, re-enter credentials exactly |
| Proxy works on Wi-Fi but not cellular | iOS limitation | Use a VPN app instead for cellular proxy routing |
| Slow browsing speed | Proxy server congestion or distance | Try a different server location closer to you |
| Some apps don't use the proxy | App uses direct connections | Not all apps respect iOS proxy settings; use a VPN for full coverage |
| Proxy settings reset after reconnecting | iOS saves proxy per Wi-Fi network | Re-enter settings or use automatic PAC configuration |
According to AIMultiple's iPhone proxy guide, the most common mistake is entering the wrong port number. Proxy providers typically assign specific ports (like 8080, 3128, or custom ports) — make sure you're using the exact port from your provider's dashboard, not a generic one.
For more on how proxy-based anti-bot bypass works at scale, see our CAPTCHA bypass guide.
Why Would You Need a Proxy on iPhone?
Most people configure an iPhone proxy for one of five reasons. Here's when each use case makes sense and which proxy type to choose.
| Use Case | Why a Proxy Helps | Recommended Proxy Type |
|---|---|---|
| Access geo-blocked content | Proxy masks your real location with an IP from another country | Residential proxy from target region |
| Privacy while browsing | Websites see the proxy's IP instead of yours | HTTPS proxy with authentication |
| Social media account management | Avoids bans when operating multiple accounts from one device | Mobile or residential proxy |
| Corporate network access | Routes traffic through company proxy for security compliance | Automatic (PAC) configuration |
| Testing and development | Developers test apps from different geographic locations | Rotating residential proxies |
For social media use cases, especially TikTok and Instagram, residential and mobile proxies perform best. We covered the specific proxy requirements for TikTok in our best TikTok proxies guide.
If you're configuring proxies for web scraping or data collection, a scraping API like ScrapingAPI.ai handles proxy rotation automatically without manual iPhone configuration. Learn more in our what is a scraping API explainer. For the legal considerations of using proxies and scrapers, see our ethical web scraping guide.
What Are the Key Takeaways?
Configuring a proxy on iPhone takes under two minutes. Go to Settings, Wi-Fi, tap the info icon on your network, select Configure Proxy, choose Manual, and enter your server address and port. Toggle Authentication on if your provider requires credentials.
iOS only supports HTTP and HTTPS proxies natively, and proxy settings apply only to Wi-Fi — not cellular data. For full device proxy coverage including cellular and apps, use a VPN instead.
Choose residential proxies for geo-restriction bypass, mobile proxies for social media management, and HTTPS proxies for general privacy. Avoid free proxies — they're slow, unreliable, and often compromised. For proxy provider recommendations, check our Bright Data alternatives comparison.


